Spring Batch with Spring Boot 3.0
Batch processing with Spring

In this article, We will explore batch processing, real-world examples, and how to use Spring Batch with Spring Boot 3 to develop efficient batch applications. So let's get started.
Batch Processing:
Batch processing is a fast way to complete a large number of iterative data jobs. In simple terms, it is a method for consistently processing large amounts of data.
Introduction to Spring Batch:
Spring Batch is a lightweight, comprehensive batch processing framework designed for developing robust batch applications. It provides reusable functions that are essential in processing large volumes of records, including transaction management, job processing statistics, job restart, skip, and resource management.
The combination of Spring Batch with Spring Boot 3 offers several benefits, including simplified configuration, easy testing, and improved performance. Additionally, Spring Batch provides a wide range of features that make it easier to process large volumes of data efficiently.

Real-world examples:
Banking / Financial services
eCommerce / Retail
For example, imagine that the company receives a file containing millions of transactions (or) millions of products from retailers each day. The company could use Spring Batch to read the file, validate the data, and then store the data in a database. Spring Batch also provides built-in support for parallel processing, which would allow the company to process transactions in a timely manner.

If you are working with the spring batch you might need to know these terminologies,
Job - In spring batch, a Job is an instance that can have multiple steps.
Step - It is a task that is represented as steps to complete the job.
Tasklet step
Chunk-Oriented step*
Chunk size
ItemReader
ItemProcessor
ItemWritter
Note: If we have Hight volume data, we have to go with chunk-oriented step.
Setting up a Spring Boot 3 with Spring Batch:
Prerequisites:
Install JDK 17, Since we are gonna use spring boot 3.0.
Install Maven/Gradle - Build automation tools
Install MySQL - DB Server
Install STS/IntelliJ - IDE
Install spring boot application using https://start.spring.io/

Note: Java versions lower than 17 won't be supported by Spring Boot 3.0.
Dependencies which are required to start:
dependencies {
  implementation 'org.springframework.boot:spring-boot-starter-batch'
  runtimeOnly 'com.mysql:mysql-connector-j'
  testImplementation 'org.springframework.boot:spring-boot-starter-test'
  testImplementation 'org.springframework.batch:spring-batch-test'
  implementation 'org.springframework.boot:spring-boot-starter-web'
}
Now, Enable batch processing in BatchApplication. @EnableBatchProcessing annotation enables Spring Batch features and provides a base configuration for setting up batch jobs.
@SpringBootApplication
@EnableBatchProcessing
public class SpringBatchApplication {
    public static void main(String[] args) {
        SpringApplication.run(SpringBatchApplication.class, args);
    }
}
YAML properties:
Spring Boot can automatically create the batch-related schema of your data source and initialize it. To enable**,** batch.jdbc.initialize-schema: always
Spring also automatically run the configured batch jobs. To disable the auto-run of jobs, we need to use spring.batch.job.enabled=false
spring:
  datasource:
    driver-class-name: com.mysql.cj.jdbc.Driver
    url: jdbc:mysql://localhost:3306/batchdb
    username: root
    password: root

  batch:
    jdbc:
      schema: classpath:org/springframework/batch/core/schema-mysql.sql
      initialize-schema: always
    job:
      enabled: false
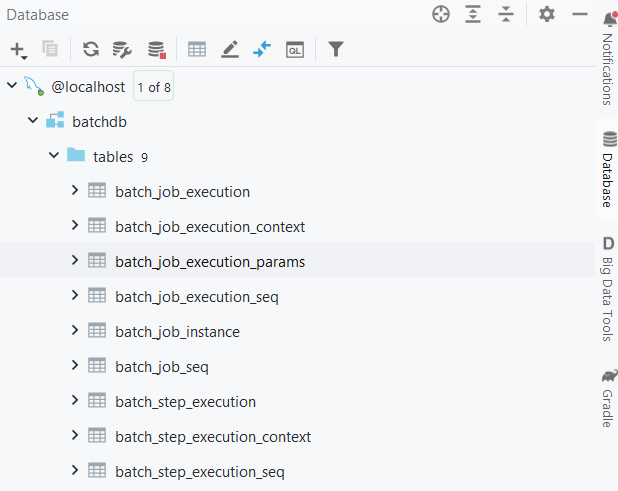
We can see the spring batch metadata tables created here.
Batch job configuration:
The basic setup is done to kick-start the application. Here is the code example for job configuration and step creation with tasklet and chunk-oriented,
@Configuration
@RequiredArgsConstructor
@Slf4j
public class BatchConfig {

    private final JobLauncher jobLauncher;
    private final JobRepository jobRepository;
    private final PlatformTransactionManager batchTransactionManager;
    private static final int BATCH_SIZE = 5;

    public BatchConfig(JobLauncher jobLauncher, JobRepository jobRepository, PlatformTransactionManager batchTransactionManager) {
        this.jobLauncher = jobLauncher;
        this.jobRepository = jobRepository;
        this.batchTransactionManager = batchTransactionManager;
    }

    public static final Logger logger = LoggerFactory.getLogger(BatchConfig.class);

    @Bean
    public Job firstJob() {
        return new JobBuilder("first job", jobRepository)
                .incrementer(new RunIdIncrementer())
                .start(chunkStep())
                .next(taskletStep())
                .build();
    }

    @Bean
    public Step taskletStep() {
        return new StepBuilder("first step", jobRepository)
                .tasklet((stepContribution, chunkContext) -> {
                    logger.info("This is first tasklet step");
                    logger.info("SEC = {}", chunkContext.getStepContext().getStepExecutionContext());
                    return RepeatStatus.FINISHED;
                }, batchTransactionManager).build();
    }

    @Bean
    public Step chunkStep() {
        return new StepBuilder("first step", jobRepository)
                .<String, String>chunk(BATCH_SIZE, batchTransactionManager)
                .reader(reader())
                .writer(writer())
                .build();
    }

    @Bean
    public ItemReader<String> reader() {
        List<String> data = Arrays.asList("Byte", "Code", "Data", "Disk", "File", "Input", "Loop", "Logic", "Mode", "Node", "Port", "Query", "Ratio", "Root", "Route", "Scope", "Syntax", "Token", "Trace");
        return new ListItemReader<>(data);
    }

    @Bean
    public ItemWriter<String> writer() {
        return items -> {
            for (var item : items) {
                logger.info("Writing item: {}", item);
            }
        };
    }
}
Now, we must build a REST API, and by using that to launch the task we built. To launch the job, We need to provide the Job name and Job parameter. For our example, the job name is "firstJob" and I have put the following code in the service layer.
private final JobLauncher jobLauncher;
private final ApplicationContext context;

public void invokeJob(String jobName, JobParameters jobParameters) {
    var jobToStart = context.getBean(jobName, Job.class);
    jobLauncher.run(jobToStart, jobParameters);
}
Demo Spring batch application:
I'm calling the API through Postman to test the application, Let's see how it works,

Logs generated by the application after launching the job:
Here we can clearly see the chunk step logs read from the source and write to the destination, If we need to process the data in between, we can use ItemProcessor. and we could see the Tasklet step logs after the first step is done.

Meta-Data Schema:
Spring batch stores the information of each job and step in the metadata table.
For example,
#### JobInstance, JobExecution, JobParameters, and StepExecution map to
batch_job_execution_params
batch_job_execution_seq
batch_job_seq
batch_step_execution
batch_job_execution
batch_job_instanc
batch_step_execution_seq

#### respectively. ExecutionContext maps to both
batch_job_execution_context
batch_job_execution_context
The JobRepository is responsible for saving and storing each Java object into its correct table. example of batch_job_execution_params in the below,

We have successfully completed our batch processing using spring batch. Here we have covered the required operations for job execution, To know more about spring batch and spring integration you can visit the spring documentation.
References: https://spring.io/projects
Source code: https://github.com/manibala18/spring-batch
Conclusion:
Spring Batch is a powerful tool for batch processing in the Spring ecosystem, and with the added features of Spring Boot 3, it's even more capable. In this post, we've walked through the basics of getting started with Spring Batch and Spring Boot 3, as well as exploring some of the more advanced features.
I hope this has been a useful article for Spring Batch and that you'll explore it further on your own.
Happy learning...!


